
How to Capture and Read DNS Traffic to 8.8.8.8 on Mac
Learn how to capture a DNS lookup to 8.8.8.8 with TCP Viewer, save it as a PCAP file, and read the DNS question and answer in simple steps.
 Proxyman TeamJuly 21, 2026Updated October 16, 20269 min read
When you open a website, your Mac needs to find the address of the server behind that name. DNS helps with this job.
In this guide, we will use TCP Viewer to capture a DNS lookup sent to 8.8.8.8. We will save the result as a PCAP file, then open the DNS question and answer to see what they contain.
You do not need any network experience. You only need TCP Viewer, Terminal, and a few minutes.
What is DNS?
DNS helps your Mac turn a name into an address.
People prefer names such as example.com. Computers use number-based addresses to find each other. DNS connects the two.
You can think of DNS as a contact list:
- Your Mac asks, “What is the address for
example.com?” - A DNS server looks for the answer.
- The DNS server sends an address back.
- Your Mac can then contact that address.
In this guide, we will send the question to 8.8.8.8, a public DNS server. Using a known address makes our small test easy to find inside TCP Viewer.
A DNS lookup normally creates two important packets:
- A request containing the name your Mac wants to find.
- A response containing the answer, or a message explaining that no answer was found.
TCP Viewer lets us see both sides.
Before you start
Make sure TCP Viewer is installed and can capture traffic on your Mac. The first time you start a capture, macOS may ask for permission. Follow the message shown by the app, then return to TCP Viewer.
Close other apps if you want a quieter capture. This is optional, but it makes the packet list easier to read.
We will look up example.com. This is a safe example name made for guides and tests.
How to capture a DNS lookup to 8.8.8.8
Step 1: Choose your network connection
Open TCP Viewer. At the top of the window, choose the connection your Mac is using.
If you are online through Wi-Fi, choose Wi-Fi. If you use a cable, choose the wired connection. The name may be different on your Mac.
If you are not sure, start with Wi-Fi. You can come back and choose another connection if no packets appear.
Step 2: Start the capture
Click the Start button in TCP Viewer. It is the button with the triangle symbol in the top bar.
Packets should begin to appear in the main list. It is normal to see traffic from other apps. We will hide that noise later.
Step 3: Send one DNS question
Keep TCP Viewer running. Open the Terminal app on your Mac and enter this command:
dig @8.8.8.8 example.com
Press Return.
This command asks 8.8.8.8 for the address of example.com. Terminal will print an answer, but you do not need to read it yet. Our goal is to capture the question and response in TCP Viewer.
Return to TCP Viewer and stop the capture. A short capture is easier to understand than a long one.
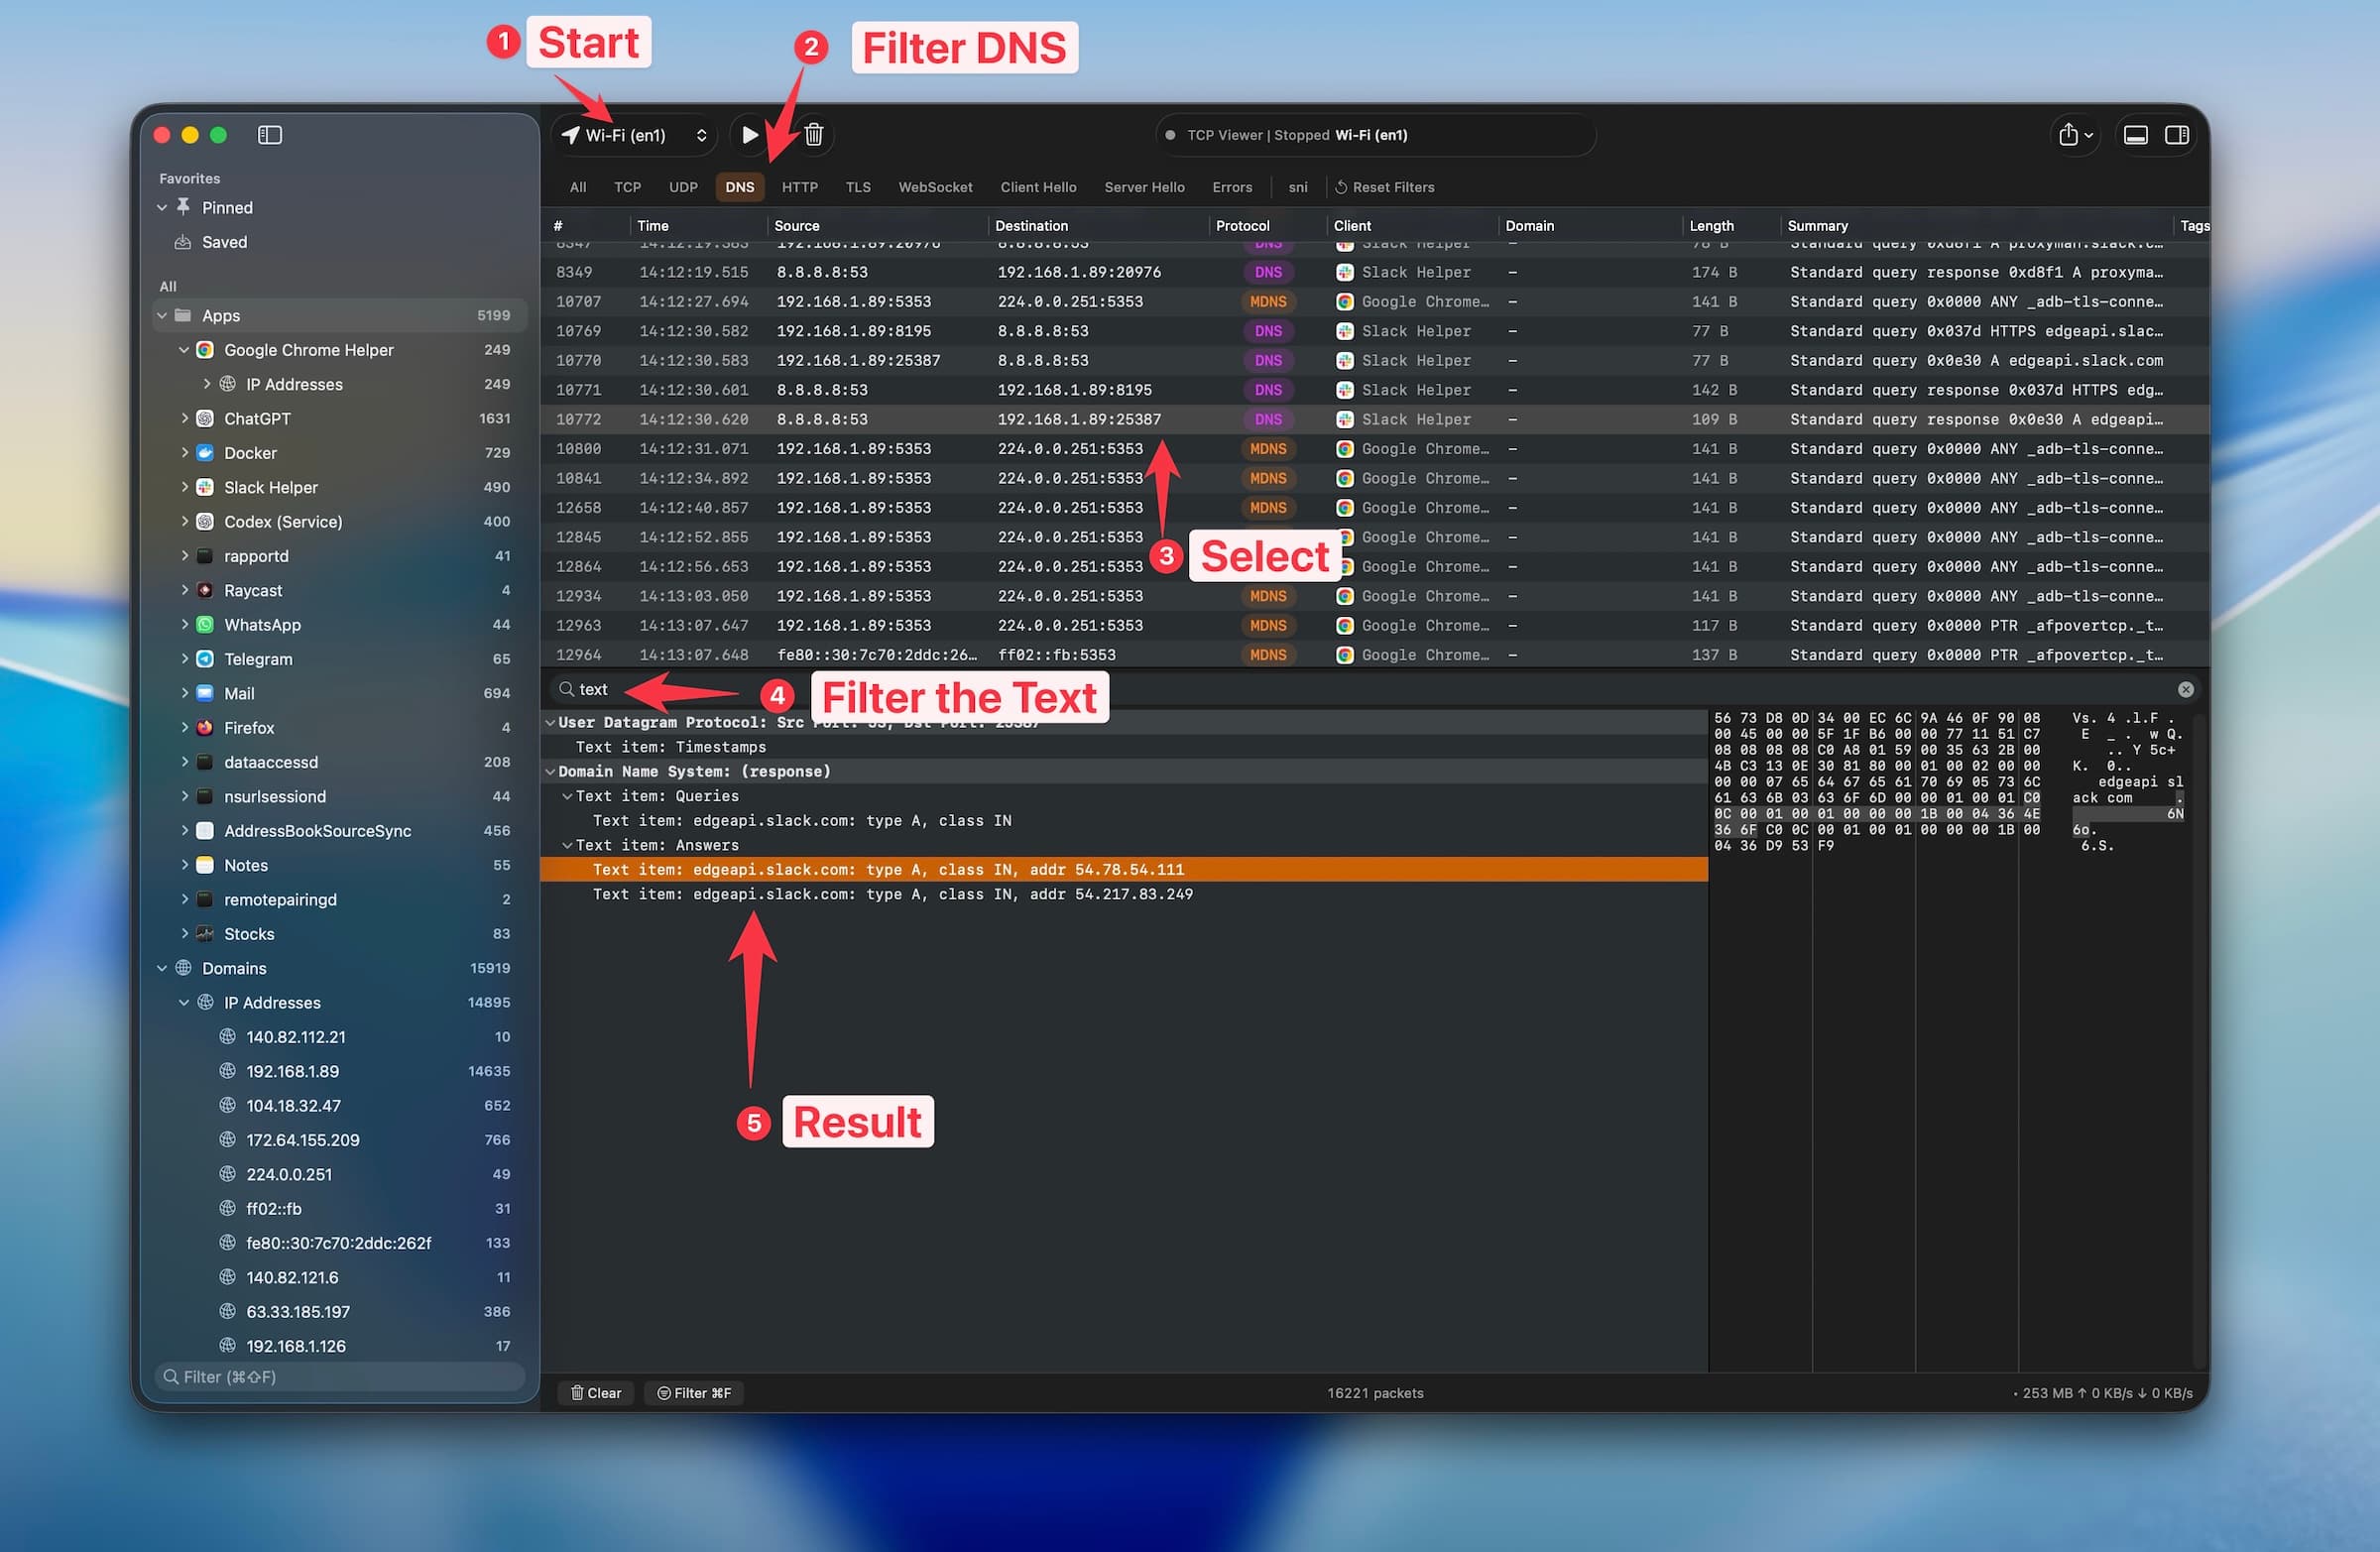
The image shows the full flow: start the capture, choose DNS, select a response, search its readable text, and find the returned addresses. This example captured edgeapi.slack.com from a running app. When you follow this guide, look for example.com instead.
How to find the DNS packets
Click the DNS button above the packet list. TCP Viewer will hide other types of traffic and keep the DNS packets on screen.
Next, look for 8.8.8.8 in the Source or Destination column. You can also enter 8.8.8.8 in the filter field to make the list smaller.
You should see at least two rows:
- A row going from your Mac to
8.8.8.8. This is the DNS request. - A row going from
8.8.8.8back to your Mac. This is the DNS response.
The first row asks the question. The second row carries the answer.
If there are several DNS rows, look at the Summary column for example.com. The request and response should appear close together because the response normally arrives soon after the request.
How to save the DNS capture as a PCAP file
Saving the capture lets you reopen it later or share it with someone who is helping you.
Keep the DNS filter active so the useful rows are easy to select. Select the request and its response, then use the Export action in TCP Viewer.
Choose one of these file types:
- PCAPNG keeps more information about the capture and is a good default choice.
- PCAP is the older, simple format and is useful when another tool asks for a
.pcapfile.
Give the file a clear name, such as:
dns-8-8-8-8-example-com.pcapng
Save it somewhere easy to find, such as your Desktop.
You can drag the saved file back into TCP Viewer whenever you want to inspect it again.
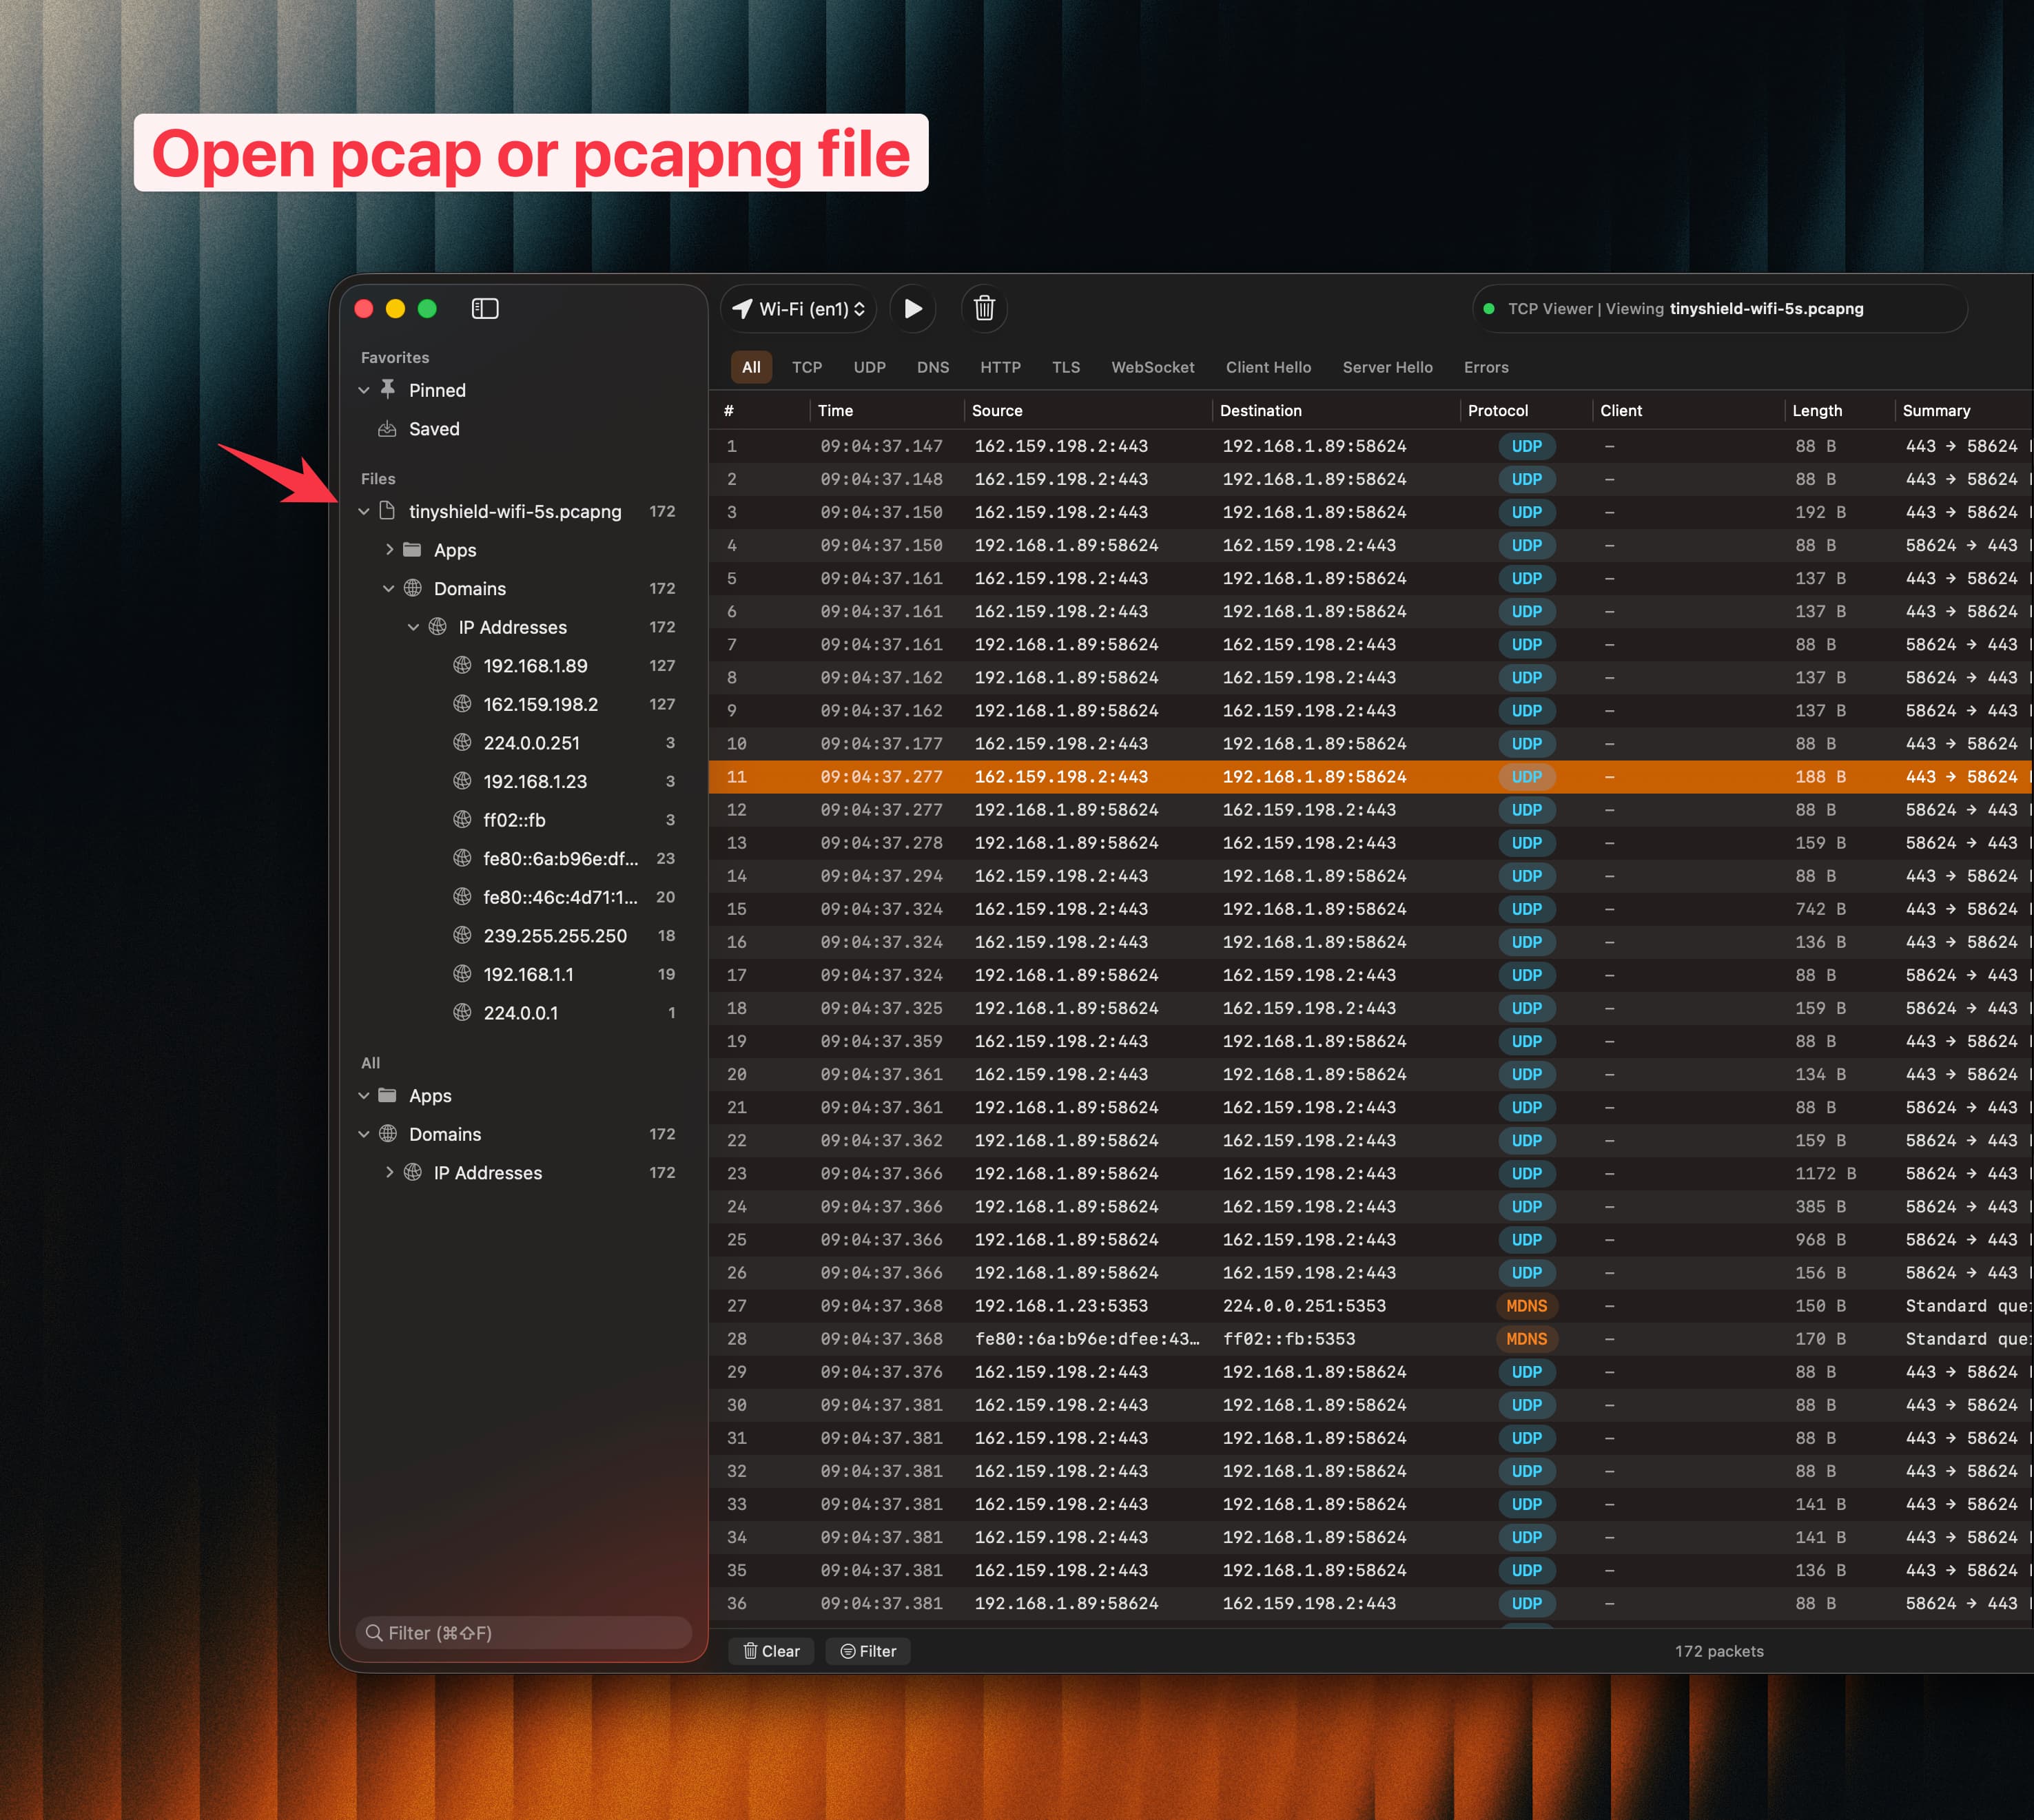
Reopen the exported file and confirm it contains the DNS request and response you selected. Check the destination address and query name before sharing the capture. See the export guide for the available formats.
How to analyze the DNS content
Now we can read what happened.
Start with the request row, the one sent from your Mac to 8.8.8.8. Click it to open the packet details. Find the DNS section and open it.
TCP Viewer will show the DNS information as readable fields. The exact labels may vary slightly, but the important parts are the same.
1. Read the requested name
Look for Query, Queries, or Name.
For our test, the value should be:
example.com
This proves which name your Mac asked the DNS server to find.
If the name is misspelled or is not the name you expected, you may have already found the problem.
2. Check what kind of answer was requested
Near the name, look for Type. This tells you what kind of information the Mac requested.
The most common values are:
- A asks for a regular server address.
- AAAA asks for a newer, longer server address.
- CNAME points one name to another name.
You may see more than one lookup for the same domain. For example, a Mac can ask for both A and AAAA. That is normal.
3. Open the response
Select the row sent from 8.8.8.8 back to your Mac. Open its DNS details.
Look for Response, Answers, or Answer records. This area contains the result returned by the DNS server.
For a successful lookup, you should see example.com and one or more addresses. The exact address can change, so focus on whether an answer exists rather than expecting one fixed number.
4. Check the result message
Look for Status, Response code, or a similar field.
Common results include:
- No error means the DNS server handled the question normally.
- Name error or NXDOMAIN means the DNS server says the name does not exist.
- Server failure means the DNS server could not complete the lookup.
A response can arrive without giving you a useful address. Always check both the result message and the Answer section.
5. Compare the question and answer
Make sure the name in the response matches the name in the request. Also check that the response came from 8.8.8.8 and returned to your Mac.
This helps you avoid reading an unrelated DNS response from another app.
6. Check how long the answer took
Look at the Time column for the request and response. The difference shows how long your Mac waited for the DNS answer.
You do not need to calculate this perfectly. A response directly below the request with almost the same time usually means the lookup was quick. A large gap, or many repeated requests, can point to a delay.
What DNS content should you check?
Use this small list during any DNS investigation:
| What to check | What it tells you |
|---|---|
| Requested name | Which website or service the Mac wanted to find |
| Request type | Which kind of address or information it wanted |
| DNS server | Where the question was sent; 8.8.8.8 in this test |
| Result message | Whether the lookup worked or reported a problem |
| Answer | The address or name returned by the DNS server |
| Time | How long the Mac waited for the response |
| Repeated requests | Whether the Mac had to ask again |
You usually do not need to read every field. These seven items are enough for many beginner investigations.
What a successful DNS lookup looks like
For this test, a healthy result should tell a simple story:
- Your Mac sends a DNS request to
8.8.8.8. - The requested name is
example.com. - The response comes back from
8.8.8.8. - The result shows no error.
- The Answer section contains at least one address or name.
- The response arrives soon after the request.
If those parts are present, the DNS lookup worked during the capture.
What if no DNS packets appear?
If the DNS filter shows nothing, check these items:
- Make sure TCP Viewer was recording before you ran the Terminal command.
- Make sure you selected the connection your Mac is using.
- Run
dig @8.8.8.8 example.comagain while the capture is active. - Turn off a VPN for this test if your workplace rules allow it. A VPN may send the traffic through another connection.
- Check whether your network blocks direct requests to
8.8.8.8.
Some apps protect their DNS traffic so the name and answer cannot be read as normal DNS content. The Terminal command in this guide sends a direct, readable test request, which makes it better for learning.
A quick checklist
- Open TCP Viewer and choose your active connection.
- Start the capture.
- Run
dig @8.8.8.8 example.comin Terminal. - Stop the capture.
- Click the DNS button.
- Filter for
8.8.8.8and findexample.com. - Select the request and read its name and type.
- Select the response and read its result and answer.
- Compare the request and response times.
- Export the two rows as a PCAPNG or PCAP file.
Final thoughts
DNS is easier to understand when you see it as one question followed by one answer. TCP Viewer lets you capture that short conversation, remove unrelated traffic, and read the important values in one place.
Start with the requested name. Then check the request type, result message, returned answer, and time. Those details will tell you whether the DNS lookup worked and what the server sent back.
Try TCP Viewer
Download TCP Viewer for macOS to capture your own DNS lookup. For the next step, read our beginner guide to analyzing a PCAP file.